
A gluten free sourdough starter is essential for individuals with celiac disease or gluten intolerance, as it allows them to enjoy the benefits of sourdough bread without ingesting gluten. The fermentation process in sourdough can make gluten-containing grains easier to digest, but for those who must avoid gluten altogether, a gluten-free starter ensures safety.
Ingredients:
Day 1
- 1/2 cup (60 g) gluten-free flour (eg brown rice flour, buckwheat flour, or a gluten-free all-purpose flour blend)
- 1/2 cup (120 ml) water (filtered or distilled is best)
-Day 2 and onward
- 1/4 cup (30 g) gluten-free flour
- 1/4 cup (60 ml) water
Equipment:
- A clean glass jar (avoid metal containers)
- A wooden spatula or spoon stirring
- A kitchen scale (optional but useful for accuracy)
- A clean bread proofing cloth
Shop KiiZYs' Sourdough Essential kits at Amazon
Instructions:
Day 1
1. Combine Ingredients
- In KiiZYs' Sourdough Starter Jar, mix 1/2 cup gluten-free flour with 1/2 cup water using wooden spatula until well combined.
The consistency should be similar to thick pancake batter.
2. Cover and Rest
- Cover the glass jar loosely with a KiiZYs' clean jar fabric cover. This allows air to flow while preventing debris from entering. Leave the container at room temperature (ideally between 68-75°F or 20-24°C) for 24 hours.
Day 2
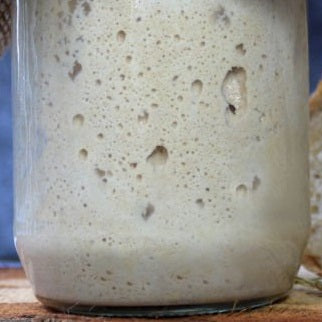
1. Check for Activity
- After 24 hours, check the mixture. You may or may not see bubbles or a slight rise. This is normal. If you see some activity, that's a good sign. If not, that’s okay too.
2. Feed the Starter
- Discard half of the starter mixture (about 1/2 cup). To the remaining mixture, add 1/4 cup gluten-free flour and 1/4 cup water. Stir until well combined.
3. Cover and Rest
- Cover the container loosely again and let it sit at room temperature for another 24 hours.
Day 3
1. Check for Activity
- By now, you should start to see some bubbles and notice a slight rise in your starter. It might also start to smell a bit sour.
2. Feed the Starter
- Discard half of the starter mixture and add 1/4 cup gluten-free flour and 1/4 cup water to the remaining starter. Mix well.
3. Cover and Rest
- Cover and let it sit at room temperature for another 24 hours.
Days 4-7
1. Continue Feeding
- Continue the feeding process as described above. You should start to see more bubbles, a stronger rise, and a more pronounced sour smell.
2. Observe and Adjust
- If your starter is very bubbly and doubling in size within 6-8 hours after feeding, it's getting strong. If it’s not rising well, you may need to adjust the feeding schedule or check for issues with your environment or ingredients.
Shop KiiZYs' Sourdough Baking Tools in store.
Using Your Starter
1. Ready to Use
- Your starter is ready to use when it’s consistently bubbly, doubles in size within 6-8 hours of feeding, and has a pleasant sour smell.
2. Maintaining the Starter
- If you plan to use it daily, keep it at room temperature and feed it daily. If not, store it in the refrigerator and feed it once a week.
3. Before Baking
- If you’ve stored the starter in the refrigerator, take it out and feed it a few times before baking to ensure it’s active.
Enjoy your gluten-free sourdough journey. xx
--> Check out KiiZYs' other gift ideas this festive season.